Blue Hedgehog Amigurumi Crochet Pattern – Step-by-Step Tutorial
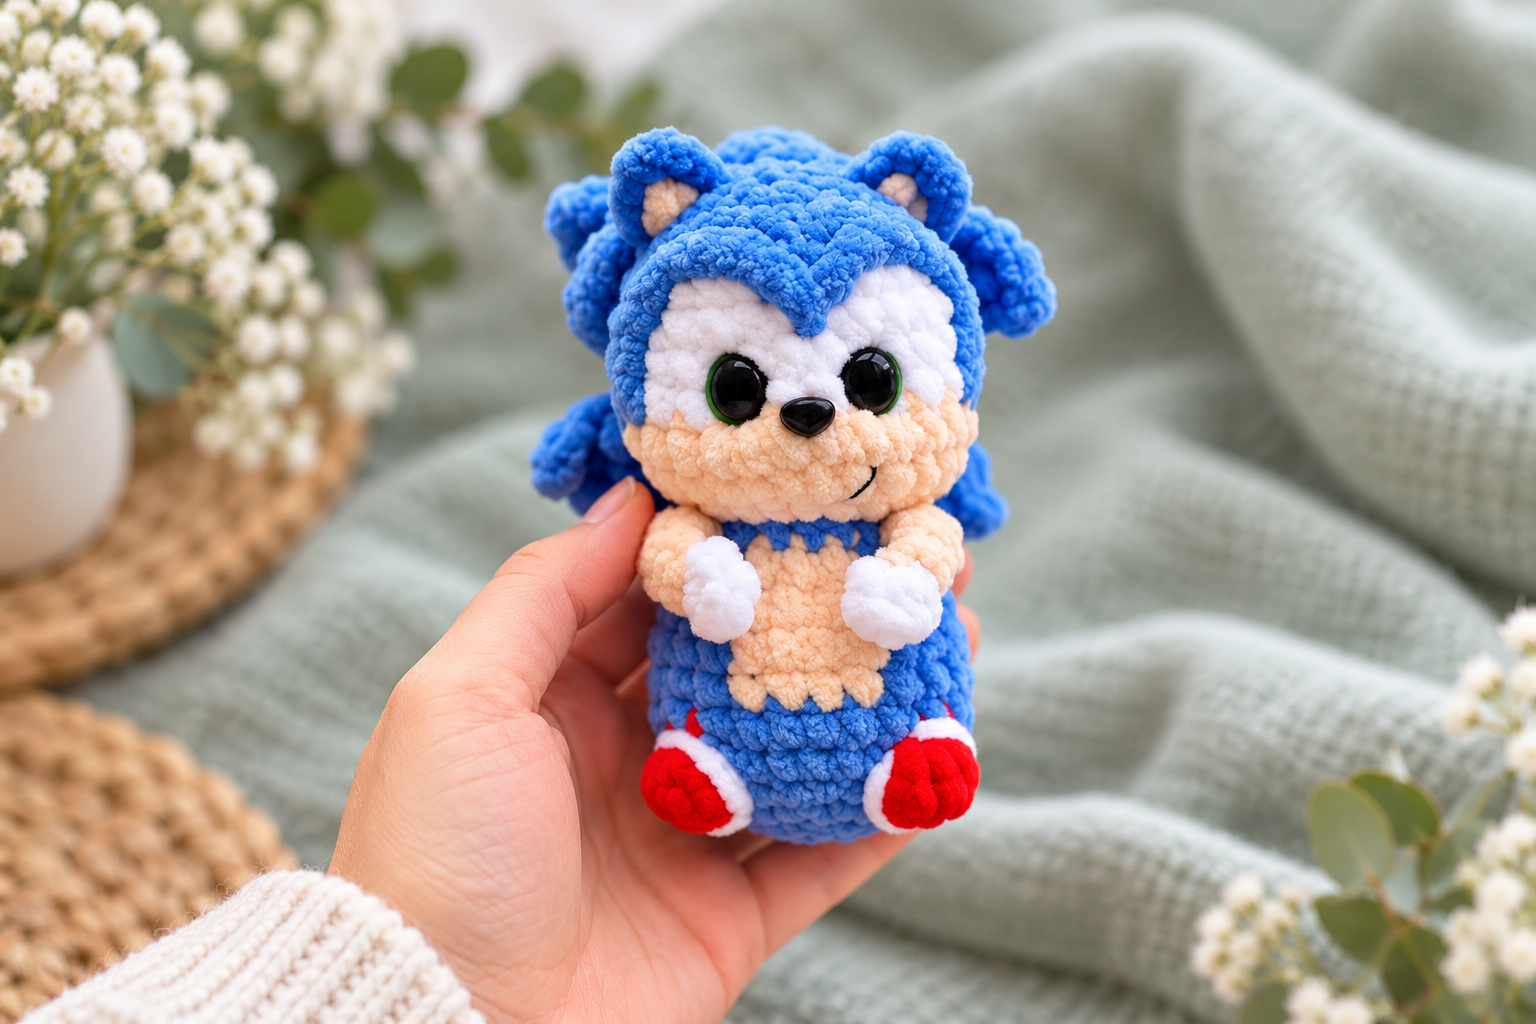
Looking for a cute and colorful crochet project? This Blue Hedgehog Amigurumi is a lovely little character made with soft, plush yarn.
With its bright blue body, peach-colored face, white gloves, and tiny red shoes, this handmade hedgehog has a playful appearance and plenty of charming details.
The finished toy measures approximately 4.3 inches (11 cm) tall.
This crochet pattern uses US crochet terminology and includes techniques such as increases, decreases, puff stitches, color changes, and decorative embroidery.
The body is worked from the bottom upward, with the head crocheted as a continuation of the body.
Follow the instructions below to create your own adorable blue hedgehog.
Materials You’ll Need
Before starting your Blue Hedgehog Amigurumi, prepare the following materials.
Yarn
Himalaya Dolphin Baby Yarn
100 g / 120 m — 100% Polyester
- Blue: 80327
- Skin color: 80333 or 80353
- White: 80301
- Red: 80318
Iris Yarn
- Black
- Green
Additional Supplies
- 3.5 mm crochet hook
- Oval eyes: 12 × 9 mm
- Safety nose: 9 mm
- Fiberfill or polyester stuffing
- Strong thread for sculpting
- Tapestry needle
- Stitch marker
- Scissors
Finished Size: Approximately 11 cm (4.3 inches).
The measurements and yarn references above follow the original pattern. Zayaka Mi Super-Hedgehog (Sonic…
Crochet Abbreviations (US Terms)
The instructions use the following abbreviations:
| Abbreviation | Meaning |
|---|---|
| MR | Magic Ring |
| CH | Chain |
| T-CH | Turning Chain |
| SC | Single Crochet |
| INC | Increase — 2 SC in the same stitch |
| DEC | Decrease — 2 SC together |
| SL ST | Slip Stitch |
| DC | Double Crochet |
| HDC | Half Double Crochet |
| HDC INC | Half Double Crochet Increase |
| BLO | Back Loops Only |
| FLO | Front Loops Only |
| Puff ST | Puff Stitch — 3 DC Together Cluster |
Instructions inside parentheses are repeated according to the number shown.
The stitch count at the end of each round appears in parentheses.
Shift Stitch: A single crochet worked to adjust the starting position of a round. After working this stitch, the next stitch becomes the first stitch of the round.
Note: The original pattern also uses TR in the spine instructions but does not define that abbreviation in its glossary.
How to Crochet the Blue Hedgehog Body
The body is crocheted in continuous rounds, beginning at the bottom and working toward the head.
Start with blue yarn. Add stuffing gradually as you work to help maintain the toy’s shape.
Keep your stitch marker positioned at the center of the back. Work shift stitches whenever necessary to maintain the correct alignment.
Rounds 1–3: Creating the Base
Round 1: Work 8 SC into a magic ring. (8)
Round 2: Work 8 INC. (16)
Round 3: Repeat (1 SC, INC) 8 times. (24)
At this stage, you have completed the circular base of the body.
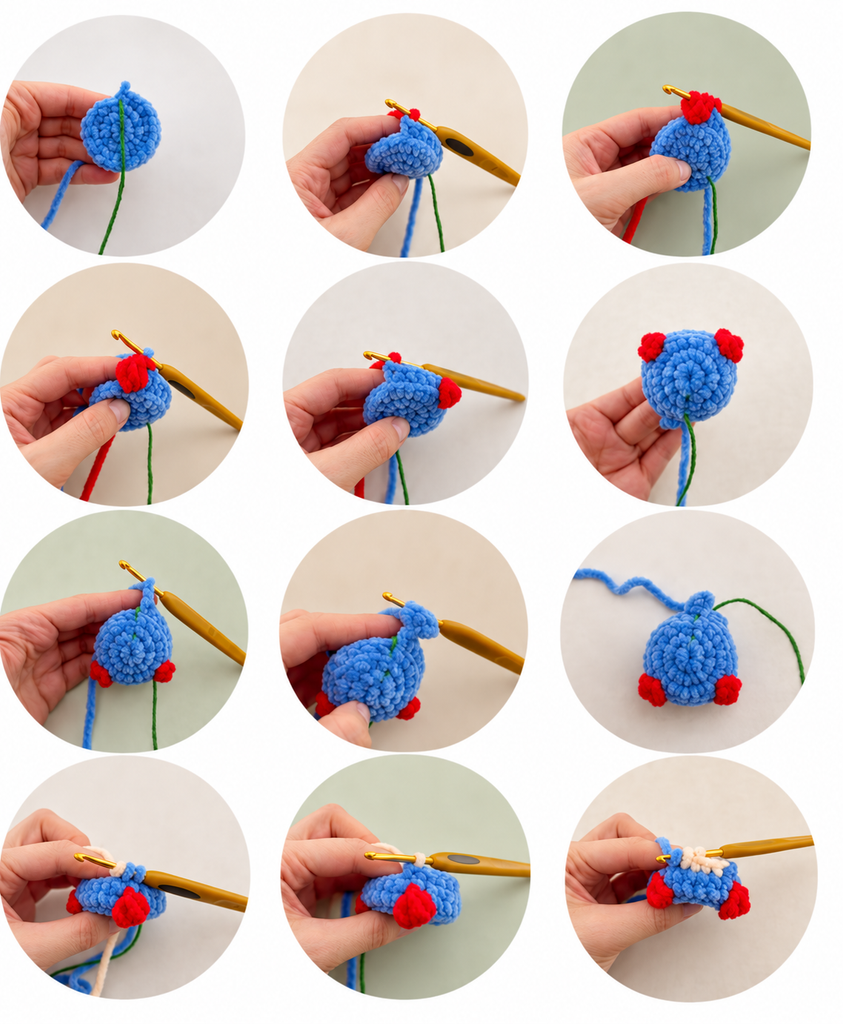
Round 4:
Work in BLO except for the puff stitches:
8 SC, Puff ST through both loops using red yarn, 6 SC, Puff ST through both loops using red yarn, 8 SC. (24)
Both puff stitches must be worked through both loops.
Video Tutorial:
https://youtube.com/shorts/37MGvHkbM3g
Round 5: Adding the Tail
The tail is worked directly into the next round.
Round 5:
CH 3.
Starting in the second chain from the hook, work:
1 SC, 2 HDC in the same stitch to form the tail.
Continue with 24 SC around the body. (24)
Rounds 6–8: Creating the Belly
Continue working with blue yarn and introduce the skin-colored yarn to create the belly.
The following instructions preserve the original color changes.
Round 6:
- Blue: 10 SC
- Skin color: 4 SC
- Blue: 10 SC
Total: (24)
Round 7:
Repeat Round 6. (24)
Round 8:
(2 SC, DEC) × 2, 2 SC, DEC, 2 SC, DEC, (2 SC, DEC) × 2. (18)
In Round 8, the first DEC following the 2 SC and the next 2 SC are worked in the skin color. The remaining stitches follow the blue sections of the original pattern.
Work one shift stitch after completing Round 8.
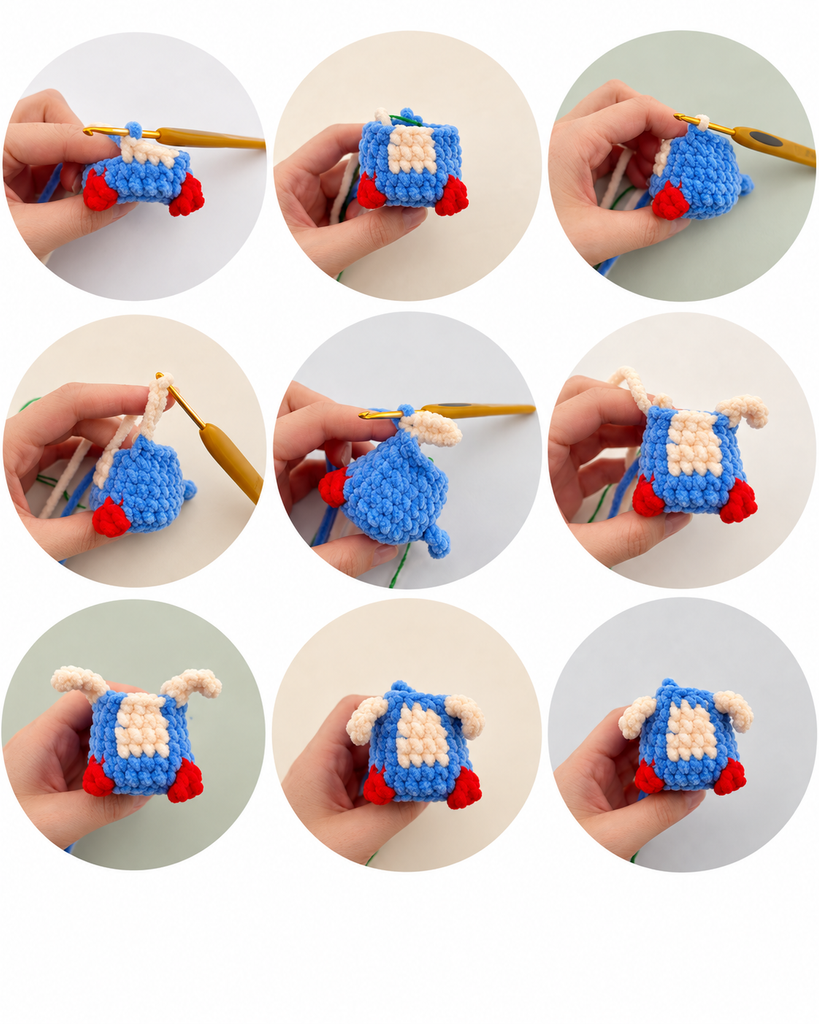
Round 9: Crocheting the Arms
In this round, both arms are created directly from the body.
Round 9:
Work the following sequence:
6 SC.
CH 5, then starting in the second chain from the hook, work 4 SC using skin-colored yarn to create the first arm.
Continue with:
1 SC, 3 SC, 2 SC.
CH 5, then starting in the second chain from the hook, work 4 SC using skin-colored yarn to create the second arm.
Finish with 6 SC. (18)
Round 10:
Repeat (1 SC, DEC) 6 times. (12)
Round 11:
12 SC. (12)
Video Tutorial for Rounds 9–10:
https://youtu.be/sYvOYahxuIM
How to Crochet the Hedgehog Head
Continue crocheting upward from the completed body.
The head is worked using blue, skin-colored, and white yarn.
Pay special attention to the color changes and stitch counts, as they create the character’s facial features.
Rounds 12–14: Shaping the Face
Round 12:
Work in FLO:
3 INC in blue, 6 HDC INC in skin color, 3 INC in blue. (24)
Work one shift stitch.
Round 13:
3 SC, INC, 1 SC, 2 SC, INC, (3 SC, INC) × 2, 1 SC, 2 SC, INC, 3 SC, INC. (30)
The following sequence is worked in skin color:
2 SC, INC, (3 SC, INC) × 2, 1 SC.
The remaining stitches follow the blue sections.
Round 14:
7 SC in blue, 13 SC in skin color, 10 SC in blue. (30)
Cut the skin-colored yarn and secure it.
Rounds 15–18: Creating the White Eye Area
Introduce white yarn to shape the upper facial area around the eyes.
Round 15:
7 SC, DEC, 10 SC in white, DEC, 9 SC. (28)
Round 16:
8 SC, 10 SC in white, 10 SC. (28)
Round 17:
Repeat Round 16. (28)
Round 18:
3 SC, DEC, 4 SC, 3 SC in white, 2 SC, 3 SC in white, 1 SC, (3 SC, DEC) × 2. (25)
Adding the Eyes and Nose
Position the eyes between Rounds 15 and 16.
Leave a distance of 4 SC between the eye stems.
Place the 9 mm nose between Rounds 14 and 15, centered between the eyes.
Once the eyes and nose are securely positioned, cut the white yarn and fasten it off.
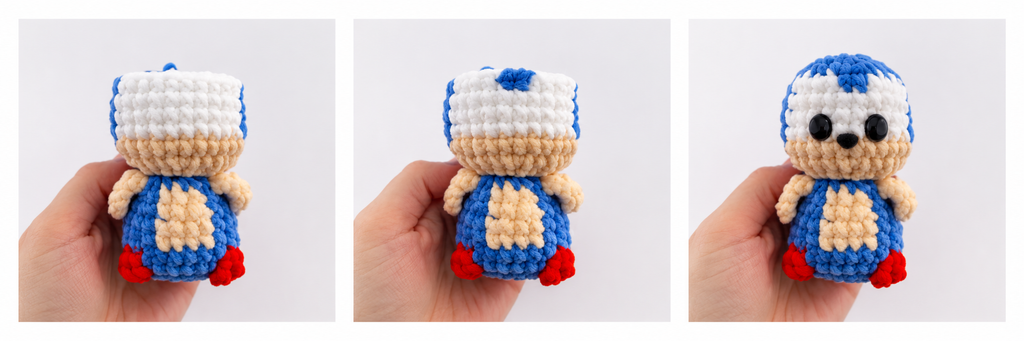
Rounds 19–21: Closing the Head
Round 19:
Repeat (2 SC, DEC) 6 times, then work 1 SC. (19)
Round 20:
Repeat (1 SC, DEC) 6 times, then work 1 SC. (13)
Round 21:
7 DEC. (7)
Use a tapestry needle to close the remaining opening.
Secure the yarn and hide the tail inside the head.
Video References:
https://youtube.com/shorts/JhyPFSP134E
https://youtube.com/shorts/zi8WLJzsWoE
Assembling and Finishing the Blue Hedgehog
With the main body and head complete, it is time to add the final details.
Step 1: Sculpt the Eye Sockets
Use the strong sculpting thread to shape the eye sockets.
This step helps define the character’s facial expression.
Video Tutorial:
https://youtube.com/shorts/OPEK1oWEVP4
Step 2: Crochet the Ears
Use pins to mark the desired ear positions.
Attach the blue yarn between Rounds 19 and 20.
CH 3.
Starting in the second chain from the hook, work:
1 SC, 2 DC in the same stitch.
Join with a SL ST between Rounds 20 and 21.
Embroider the inside of each ear using skin-colored yarn.
Fasten off and hide the yarn ends.
Video Tutorial:
https://youtu.be/tKxprW6z64E
Step 3: Finish the White Gloves
Attach white yarn to the end of each arm.
Work the following stitches into one stitch:
CH 1, 2 HDC, CH 1, SL ST.
Cut the yarn, leaving a long tail.
Secure the ends with several knots.
The original instructions also specify trimming the excess yarn and carefully sealing the ends using a lighter.
Video Tutorial:
https://youtube.com/shorts/BVr1xJVpU5Q
Step 4: Embroider the Facial Details
Use doubled green Iris yarn to embroider highlights along the outer sides of the eyes.
With black yarn, embroider the mouth at Round 13.
The mouth should extend across 2 SC.
Next, use blue yarn to crochet around the white muzzle area.
Video Tutorial:
https://youtu.be/Qs9ilFT0BUM
Step 5: Crochet the Blue Spines
The blue spines are the final distinctive feature of the hedgehog.
Begin by marking the spine positions with pins.
Attach the blue yarn to the back of the ears.
Upper and Central Spines
Repeat the following sequence 5 times:
CH 5.
Starting in the third chain from the hook, work:
1 SC, 2 DC, TR.
These form the three central and upper side spines.
Lower Side Spines
Repeat the following sequence 2 times:
CH 4.
Starting in the second chain from the hook, work:
1 SC, DC, TR.
Fasten off and secure the yarn ends.
Video Tutorial:
https://youtube.com/shorts/X2_xeOqs_KQ
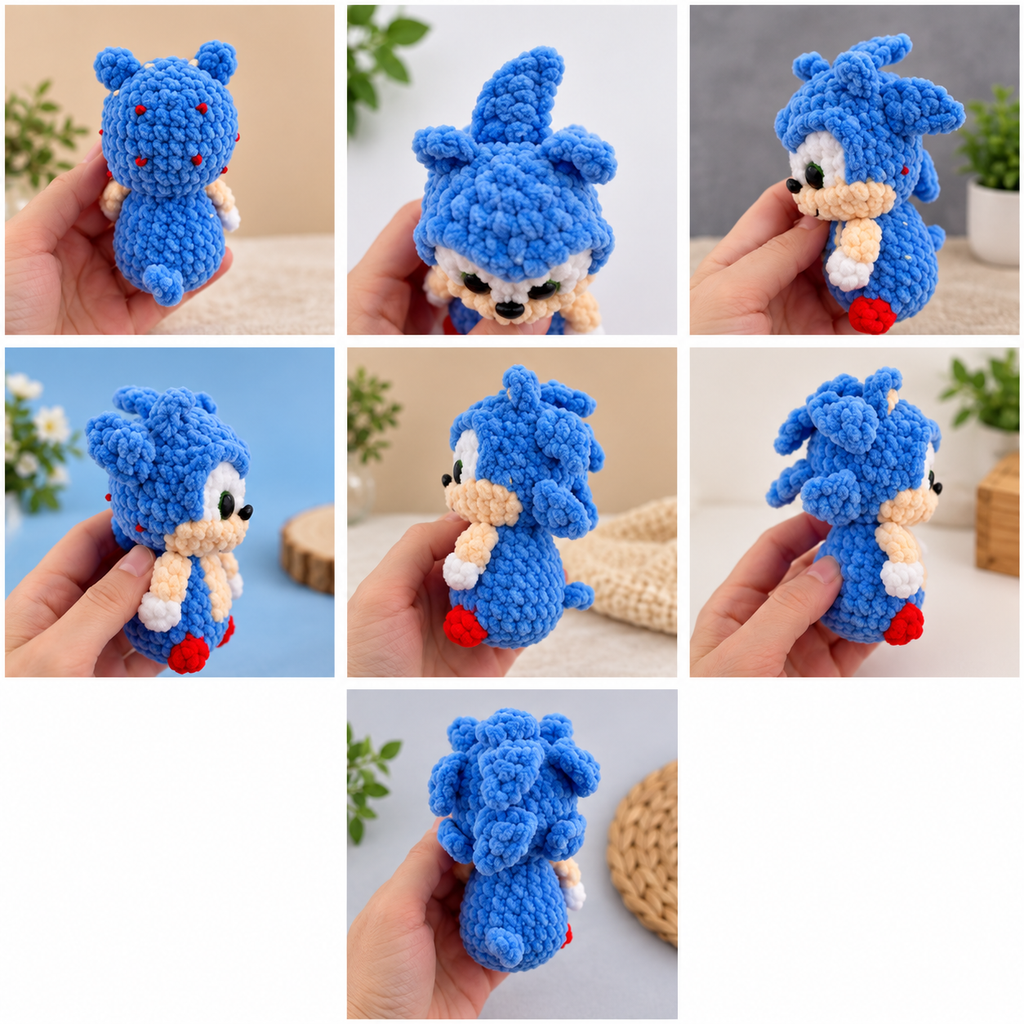
Your Blue Hedgehog Amigurumi Is Complete!
Your handmade blue hedgehog is now ready!
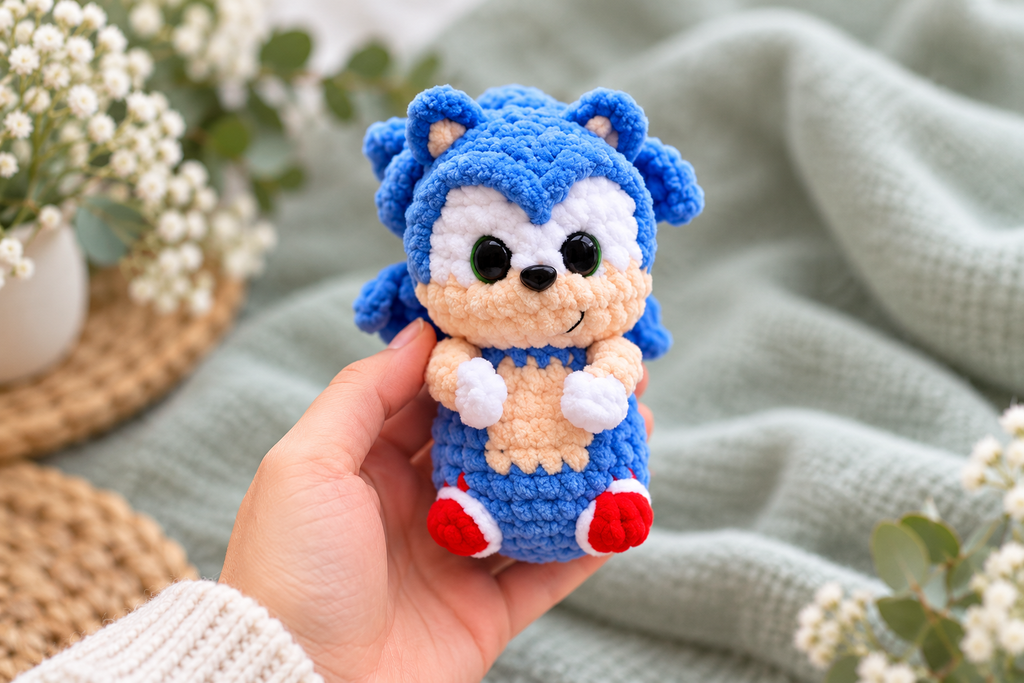
The finished character features a plush blue body, a peach-colored belly and face, white gloves, red feet, and decorative blue spines.
The combination of soft chenille yarn, contrasting colors, and carefully embroidered facial details gives this little crochet character its charming appearance.
Enjoy Your Crochet Project!
We hope you enjoyed working on this colorful Blue Hedgehog Amigurumi.
Whether you’re exploring plush yarn projects or adding another handmade character to your crochet collection, this little hedgehog is a lovely example of creative amigurumi work.
Happy crocheting!